Tuesday, March 20, 2012

Tutorial Tuesday - The fundraiser apron

Theatre is a passion of mine, so when I was asked to help a local theater with a fundraiser, I was game. The tutorial for today is for the apron that I am donating to The Sunset Player's silent auction. I used left over fabric from some other projects, but you could use sheets, large button down shirts or piece together scraps for a patch work apron.

Measurements

 1 top panel   35" long  10" wide


Middle panel A   35" long 8" wide


Middle panel B  35" long 8" wide


1 ruffle 50" long 3"wide
2 pocket panel  9" long 9" wide (this material can be a combination of any of the fabrics or something totally different. I used left over fabric from the middle panels.)
2 ties 22" long 2" wide

First, measure and cut out your pieces.

Pocket


Pin pocket pieces right side facing.  Sew the 2 sides, bottom and top, leaving a 2 inch
opening on bottom.


Clip all 4 corners of the pocket at a diagonal. This will reduce the amount of material on the inside corners of the pocket once it is right side out.


Pull pocket through opening. And yes, that is a little baby arm in the background. He always tries to help.


Press pocket and top stitch around the outside. Set pocket aside.

Middle and Top Panels


Pin middle panel A to the top panel. Stitch panels together.


Pin and stitch middle panel B to the other side of the top panel.


Once A and B are sewn to the top panel is will be one large piece, as shown above.


Open the seams and press. This makes the seams flat. Sometimes, I am lazy and skip this step, but I always regret it.


Pin pocket to front of panel A either on the side or middle of apron. I placed the pocket on the side, but centering it in the middle works too. Stitch the pockets bottom and 2 sides on the panel with a straight stitch, leaving the top of the pocket open.


Ruffle


Fold the ruffle material in half and press lightly. Fold over both ends about a 1/2 inch and press. Top stitch the ends of the ruffle.


Pin the ruffle to the bottom of panel A facing upwards. Pleating the panel every 2-3 inches.  Stitch ruffle to panel A using a zigzag stitch.


This is what your apron looks like so far.


Now, fold your apron in half with right sides facing and ruffle facing inward, just like when you pinned the ruffle on the panel. Pin and straight stitch the panels together across the bottom just above the zigzag stitch.


Pin the sides of the apron leaving a 4 inch opening on the top panel on both sides. You will use the opening to pull the apron right side out and to attach the ties. Pull apron through one of the openings, so it is right side facing, and set aside.


Ties


Press the top, bottom, and ends of the tie with a fold over of about 1/2 inch. Clip the edges of the end fold at an angle to reduce material bulging. 


Top stitch across the top, bottom and sides of the tie. 


Insert one end of the tie in the top of the opening on the apron. Repeat this on the other opening on the opposite side.


Top stitch downward to the ruffle on both sides.
That's it. You made an apron!


If you want this apron, it will be available at The Sunset Player's  Spring Fling silent auction in Cincinnati on March 31st.


I'd love to feature your apron on my blog, so send me pictures at purdyeveryday@gmail.com.

What's up for next week? I will just say that you will be in knots over it!


Tuesday, March 13, 2012

First Tutorial Tuesday

Lots of hair on this baby!
I have a baby with crazy hair. I am constantly pushing the hair out of his face. I am not ready to cut his hair, so the solution is a hair band.


Cut the sleeve of a small t-shirt off at desired thickness. You can adjust the size of the band after cutting. I wanted the hair band to be rugged, so I did not hem the edges, but that is an option. I used a t-shirt that was very worn. In some of the pictures you can see the jagged edges.
Try the band on the babies head and see if it fits. If you need to make it smaller just use you fingers to pinch the amount that needs to be hemmed, pin it, and then stitch across the band.

Add embellishments of your choice, but do not add anything that the baby could choke on. I cut out some t-shirt flower petals and sewed them on the side. My little one is a boy, so maybe I should have cut out some fire trucks for his hair band. Maybe next time.
Hand stitch the flowers on the band.
Noah says, "This is the way dude's with long hair wear their hair bands."
He is okay with wearing flowers sometimes.


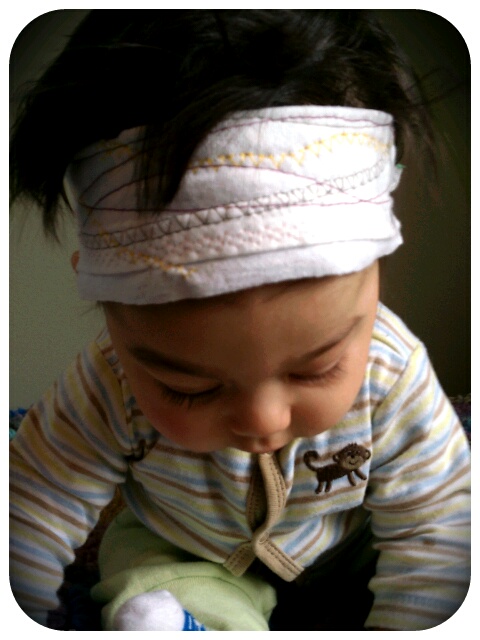
Another option would be to fold the band in half and sew across the hem. I added some decorative stitching and different thread colors to this hair band.

The bands can be adapted for adults too. Just use an extra large t-shirt or cut the band open and add elastic to make it larger.


Now, Mr. Noah can play without hair getting in his eyes. I would like to note that I only let him wear the hair band when I am around to supervise, since he could pull it down over his head. If you would like to add some Velcro on the band for a quick release, just cut the band open and sew the Velcro on both ends. Hope you enjoy this super simple, but adorable hair band.
Happy creating!

What embellishments did you add to you hair band?

Monday, March 12, 2012

The most amazing post ever


Smile! Life is fun.
My husband complains that I speak in absolutes. That is just me. I like to use expressive words like, the greatest, best, wonderful, and worst. There are some things that fall in the middle, but if they are just mediocre, I don't think twice about them. That said, I am so excited about the upcoming Tutorial Tuesday. I think it is going to be the greatest new adventure. I have some really fun ideas in the works. The first couple of tutorials will be all about re-purposing t-shirts. See you tomorrow.

Tuesday, March 6, 2012

Tutorial Tuesday

I am on a quest to learn as much as I can. It is important to exercise your body as well as you brain. With that thought, I came up with Tutorial Tuesday. Every Tuesday I will be posting a tutorial on something new. The tutorials will be mostly focused on re-purposing, but I may throw a couple of different things your way. I have some fun stuff planned, so make sure you tune in every Tuesday.

Here is an example of a tutorial I wrote a year ago about composting. 

Simple Composting

Materials needed: compost bin, browns, greens


What are browns and greens?
Browns (carbon) - these are leaves, very small twigs, dryer lint, hair (animal or human), paper, card board, hair
Greens (nitrogen) - non meat by products, fruits, vegetables, egg shells

You can use a commercial compost bin or a large plastic container. I would recommend a large bin if you have 2 or more people in your household. The large plastic container would be good for a 1 person household. I would also recommend a container that will allow you to stir the contents easily.


Standard composter


Tumbler composter
Location, location, location
A good spot for the bin would be close enough to the house so you will be inclined to dump your stuff, but not too close to the house just in case it smells. Behind a garage or down wind of the house works best.

Outdoor stuff
Walk around your yard and collect leaves, mulch, small twigs (do not put a lot of twigs in the compost it will take forever to break down! I did this the first year I composted. A pain in the butt.) Throw that stuff in the bin.

Kitchen scraps
Designate a container in your house for your veggie food scraps. I try to dump my household scraps everyday, but of course I am not that dedicated, especially in the winter. Don't be lazy like me and put your kitchen compost scraps in the freezer, just go ahead and take it to the compost bin. I have since stopped doing that because I would end up with a freezer full of banana peels. Geez!!

Basement lint
I have the hardest time remembering to save my dryer lint. I just put a bucket next to my dryer to help me remember.

Misc stuff to add
**I collect my dogs hair after I brush him. He likes the brushing and doesn't mind sharing some of his excess hair.
**hair from my hair brush
**I tear up the card board inside of toilet paper rolls
**paper bags
**paper napkins and paper towels that do not have any meat products on them

Let's speed up the process (For more tips....Make better compost)
If you are in a hurry to produce some brown goodness, then you will need to be more exact about what you add to the bin. You will need a good ratio of browns to greens. Technically, it should be 30:1. I think this is hard because I typically have more greens than browns. If you add too many greens the compost will smell. Yuck! If you add too many browns it will take a long, long time to compost. 

A couple of tips;
**Water the bin. If I know it is going to rain, I will take the lid off my bin or I will empty the old ice out of the ice maker into the bin. You want the compost to be moist, but not soaking wet.

**Keep it hot. A covered bin is better for maintaining a warm temperature.

**Do not put weeds or other plants in the bin unless you want to grow weeds everywhere you deposit your compost.

**No dog or cat poop. You don't want to contaminate the compost with intestinal parasites.

**Stirring the mix every couple weeks will allow air to circulate so bacteria can thrive.


What is the most creative things you have added to your compost bin?  Q-tips, I got that idea from Recycle bank. What about you?

Monday, March 5, 2012

Things I love

I found some really cool stuff online, and I like to share things that I have learned, so here we go. Hope you enjoy my current love's.

Wine cork planters

I love succulents because you can forget about them and they will be okay. Water them once a month or every couple of months and they still survive!!  This tutorial by Jannicake demonstrates how to plant the succulent buds in wine corks. I haven't tried this yet, but it is on my "to do" list.


Tutorial and picture by Jannicake

Pretty purse
The Grandview bag
I am a sucker for cute purses, so of course, I really liked this one. You can't go wrong with ruffles.
Tutorial and picture by The Boy Trifecta


The 1 minute chocolate cake by Chocolate-Covered Katie.
I made this single serving cake everyday for an entire week, it was delicious. I was thinking about mixing the dry ingredients and putting it in a container, then when I wanted cake I would just need to add the wet ingredients. Okay, so I have an addiction to chocolate. I also have made the flourless chocolate chip cookies, which were very yummy.

Check back next month for more "Things I love". Let me know if you make any of these things I've posted. I want to know how they worked for you. Have fun.

Friday, March 2, 2012

The one cold day of winter


I found some pictures from the holiday City Flea . It was a beautiful winter day, with lots of people dressed as Santa. 


We featured patchwork stocking at the Flea. They were a hit.


Thank goodness for the outdoor heaters and Coffee Emporium, it was just a little chilly.


Related Posts Plugin for WordPress, Blogger...